


Quick and Easy Seven Layer Slice
How’s your pantry looking now that the festive season is over?
Mine seems to have a lot of bits and pieces leftover from all that Christmas baking. That can happen at any time though, can’t it?
I’m officially over Christmas food at this point, but who doesn’t crave a little sweet snack with a cuppa to keep you awake around 2-3pm? Or maybe it’s just me!
With all that in mind, I’d love to share this quick and easy Seven Layer Slice recipe with you. I’ve been making it for years, as it’s the perfect recipe to use up all those bits and pieces in the pantry.
There are some simple rules you need to follow to make sure it all stays together, but trust me; the results are amazing.
Let’s start with a baking tin, of course. I use USA Pans of all kinds, their Biscotti Pan is perfect for this recipe (or any slice actually). It’s a very specific name for a tin that can be used for so many different things (other than biscotti). Every baker needs a tin shaped like this.
USA Pans have a brilliant non-stick coating on them. We pretty much have all the different shapes and sizes in our kitchen at Bec’s Table, and use them every fortnight in Bake Club. Because of this wonderful non-stick coating, you don't have to line them most of the time. Oh, unless you’re making meringue, you have to line all tins if you’re going to bake meringue. Trust me ;-(
Anyway, if you opt to line your tin, here’s my cheats way. Bulldog clips are really handy for clipping down baking paper with no mess.

As for the rules, they’re really easy to remember. You don’t have to weigh anything. I use a cup to measure everything except the butter. For the butter, you need enough to make your biscuit crumbs stay together. Have a look at the recipe I’ve given you below. Basically, if I have a cup of crushed biscuits, I use about 120g butter.
Ingredients are layered one at a time into the tin using roughly the same quantity of each (a cup, a jug, a bucket – haha!) Read right through to the end, including the recipe, and you’ll get the idea.
So here are the layers. You don’t want them too thick - check my photos to give yourself a better idea:
- Biscuit base: I like to use Granita biscuits. Pastry Chefs all over Australia use Granita biscuits for flavour and texture, but if you have leftover biscuits of any kind, they will be fine.
- Butter: Melted, to help the biscuit stay in place. Just like you would a cheesecake.
- Nuts: Next layer can be nuts. Any sort of nuts, either a single variety or a mix. I’m using a mix of nuts that I have leftover.
- Chocolate: Here’s one of those layers you need to have for stickability. What a shame to have to use chocolate I hear you say – haha! I like to stick this layer somewhere in the middle, but it can be second from the top as long as your layers aren’t too thick. Make sure it’s good chocolate that you like the taste of, or it will ruin your slice (this goes for all your ingredients).
- Dried Fruit: For the layer of fruit I’ve got sultanas, currants and glace cherries, but once again just use what you have. I’ve made it with just dried apricot before, and that was delicious too.
- Coconut: Now for me, I could leave this out, but then it would be a six-layer slice and I’d have to change the name! The coconut usually goes on second from the top but it really doesn’t matter as long as the layers aren’t too thick.
- Condensed Milk: This acts as our delicious glue to stick our layers together. This stuff bubbles down through the layers, sticking them together as it goes. And because it’s being baked, it turns into caramel (dulce de leche actually) and really, who doesn’t like that??
Layers 3, 4, 5 and 6 can be shuffled around to your liking, but 1 and 2 need to be on the base, and 7 needs to be on top. Easy! It makes sense, right?
So, in terms of quantities – you’ll need about a cup of each ingredient except the butter which needs to be around 100g.
If you’re still not sure, check this recipe out. This is what I’ve done in the photos. You’ll only need to make it once before you can recreate it again without needing a recipe, it’s just that simple.

Seven Layer Slice
1/4 cup butter, approximately (100g is close enough)
1 cup biscuit crumbs
1 cup nuts
1 cup chocolate chips
1 cup dried fruit
1/2 cup coconut or up to a cup
1 can sweetened condensed milk
Instructions:
- Preheat the oven to 170°c.
- Melt the butter
- Crush the biscuits
- Add the crushed biscuits to the tin and press into place.
- Add the rest of the layers, finishing with the condensed milk, and bake for around 25 minutes or until lightly golden.
Bec’s Tips:
Now you have to be completely patient. Wait for it to cool before you remove it from the tin and start cutting. Grab a bread knife (or pastry knife) and cut it into fingers. We use Victorinox Swiss Classic Ergonomic bread knives at Bec’s Table, as they are perfect for a clean cut that won’t crush your bakes.
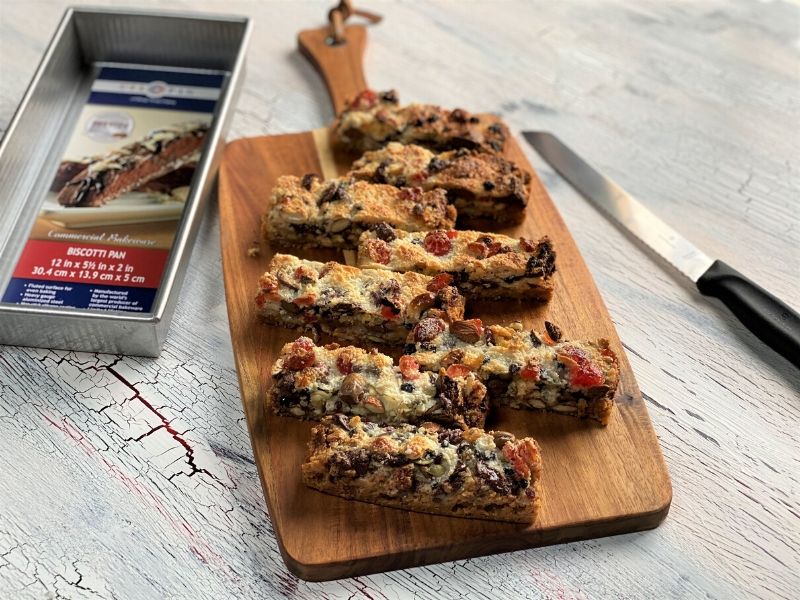
Ta-Da. Can you stop at just one?